Friday, August 16, 2013

I'm Just Digging Myself Out of My Sewing Room


Personally, July was a crazy-month for us.  We had a lot of company which is always great and then we took off for two weeks to Wyoming and Montana.  It was beautiful and a well-deserved break.  


But as soon as we landed, I hit the ground running, making up for lost time to get ready for Lazy Daze.  And let me tell you, I can't say I feel the Lazy part of it, but I'm definitely feeling the Daze. Well, the deadline is just a week away and my to do list is diminishing, or rather, I'm running out of time for my to-do list.  Regardless,  I'm super-excited and relatively happy with my inventory.  Along with my READ bags and clutches, there are a couple of new things that I'll be displaying with hopes that people like it:  Linen Napkins and Vintage-Appliqued Tea Towels-each packaged in its very own berry basket-great for giving.


Monday, June 03, 2013

Flea Market Find

Modge Podge Rocks...I know this isn't an original thought, but it really is true.  A while back, I made a shadow box for Kate.  She (and I) collect these small Hagen Renaker glass animals.  I modge podged vintage paper dolls all over a shadow box for which she can display her collection.

Recently, at the flea market, I found a new shadow box for 3 bucks.  I snagged it.

At first,  I thought I would make another for Kate as her collection has grown too big to fit comfortably in the small boxes.  But after stepping on one of Henry's superhero figures one too many times, I remembered seeing a great idea somewhere...I would make him his own shadow box where he can house his superhero collection.  I would hang it low to the ground so that he can play with it.  And this shadow box will have naturally, comic books.


Wednesday, May 15, 2013

Monday, May 06, 2013

Apex Peak Fest 2013

Thank you to all of those that stopped by my booth at the Apex Peakfest this past Saturday.  I would say that the day was a success, dodging our Seattle-like weather for most of the day-and we only lost the tent two times through some big gusts of wind!  For Lazy Daze, I'll be sure to get some weights!

Here's the snapshot of the booth, situated perfectly by the music stage!


And now it's time to get ready for the next show-Lazy Daze in August...

Friday, May 03, 2013

Thursday, May 02, 2013

Today...

He's...


4!


Flea Market Find


I visit a lot of estate sales, flea markets, and antique shops.  I really do enjoy it.  It's like modern-day treasure hunting.  You never know what you might find.  I know enough to never really look for anything specific, because you'll never find that.  But if you have an open-mind, you can find something AWE-SOME! Last week I came across a table filled with vintage linens.  Usually vintage linens are plentiful at flea markets, but what was unusual about these linens were the prices.  She was giving away armfuls for dirt.  Perhaps because they were mostly dirt and not in the best shape, but after some digging I found my armload.

There are many recipes for cleaning your linens, but this is what I did:    I first filled my bathtub with oxy clean and warmish water.  Soaked my linens in for several hours.  Rinsed, and then refilled tub and soaked again.  I then hung them outside to dry in the sun.  This made most of them like new.  For any stains, I spotted treated them with a paste of salt and vinegar.  I applied this compound and let it soak for several days on the spot.  If this wasn't enough, I also tried hydrogen peroxide as it sort of bleaches the fabric very slowly, not harshly, thereby can remove some spots.  There are other treatments out there, just do a google search and you are sure to find additional home remedies that might do the trick. I have heard fantastic things about quilt wash which can be purchased at your local quilt shop, or obviously, online. But, I haven't tried that yet. I will with the next batch....


After the linens were fresh and clean, I decided to breath new life into them by creating something new from them.  There are countless things that one can do with them (pillow cases, embroidery fabric, doll clothes, etc..etc...) but I decided to applique specific cutes from the linens onto dishtowels, thus creating kitchen towels that are vintage- inspired.


Saturday, April 20, 2013

Valley of The Dolls Part 3

Here's the latest of my doll trio...I am really in love with these gals...and they smell like strawberries too!


Wednesday, April 10, 2013

This-N-That

Here is a collage of my This -n-That Necklaces that I have been excitedly creating from vintage earrings and other found objects.  It has been great fun scouring flea markets and antique shops for the components.  Now, I just can't decide which one I'll keep for myself.  I think the green one, as one of the earrings is from my great-grandmother....Which one do you like?


Wednesday, April 03, 2013

The Fantastic Mr. Fox


Don't you just love Wes Anderson?  I am a long time fan of his movies-The Royal Tenenbaums is perhaps one of my all time favorite movies.  His cinematography (if that's what you call it) is so stylized and distinct, it reminds me of Instagram before Instagram was, well, Instagram.  So when he put out his first animated feature, the Fantastic Mr. Fox, he did not disappoint.  I mean how could blending Wes Anderson and Roald Dahl be disappointing?   This is my ode to The Fantastic Mr. Fox. 

Tuesday, April 02, 2013

Two Simple Rules...

When I am sewing, there are two rules that I follow consistently.

1.  Always buy the best materials you can afford.  Think about it, if you are about to spend the next several hours, and maybe even days making something with your own two hands, make sure you LOVE the materials that you are working with.  If you love the fabric that you are about to rip into, then you will end up making something that you will love.   This does not always equate to money, but sadly, it often does.  So for my two cents, if your going to put so much of your time into making something, make sure that you are using materials that you really love.

2.  Take great caution to cut your lines straight.  I believe this is the key to sewing.  When you sew, you follow the edges of your fabric along your seam guide, hence straight cuts are the key.

Here's an easy project that gets miles in our home:


Simple Pajama Pants:


Materials:


-Fabric-Now for this project, I really love the flannel prints that are abundant at Joann's, especially for children's pants as they grow so quickly.  It's fun, comfy, and very affordable.  You'll need about 1-1 1/2 yards depending on the size.  (make your pattern first and then measure to see just how much you'll need)
-Non-roll elastic

You don't need to buy a stinking pattern, let's first make our own:


1.  Grab a pair of pants that fit, fold in half lengthwise (like a hotdog bun-I used to tell my students that for a vertical fold) and lay them on some paper.  I like to use freezer paper, but you could just tape together regular computer paper...Or even wrapping paper, really anything.  Trace around them, adding about 1/2 inch for the seam allowance and about 3-4 inches to the top for the elastic casing and about 3 inches to each pant leg for the bottom hem..  Pull the waist band taught when you trace the waist portion to show the true size.  Do 2 traces:   one for the front, and then refold the opposite side for the back of the pants.  Usually there is a very slight difference.


Trace Back of Pants
Trace Front of Pants

2.  Cut the pattern pieces and place on your folded fabric.  Trace around and cut your pants' pieces...You'll have 4 pieces: 2 fronts and 2 backs.  Do not cut on fold, you want 4 separate pieces.

That's all there is to making the pattern...Again, why buy one?  

Sew it up!


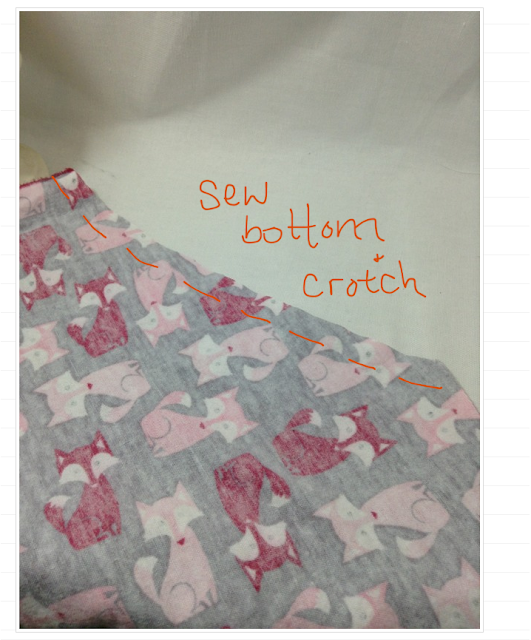
1.  Put the front pair RST and sew along the crotch curve.  Put back pair RST and sew along bottom curve.  You will now have 2 pieces; one sewn together at the crotch, and the other sewn together at the bottom.  Finish each seam with a zigzag stitch.


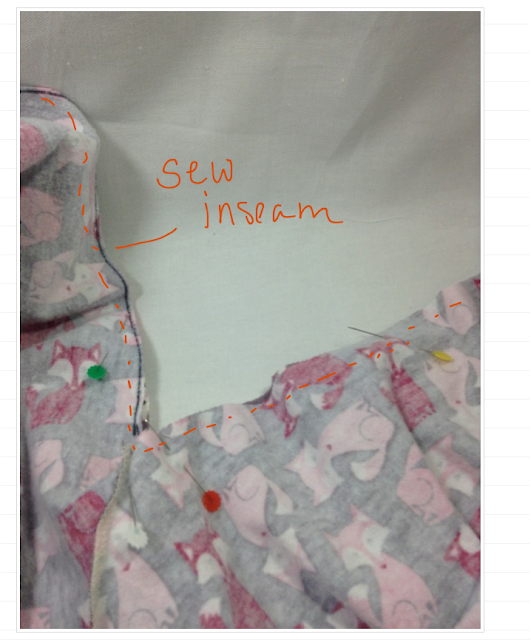
2.  Put front and back RST, and pin along the inseam.  Sew along the inseam.  Finish seams with zig zag stitch.
3.  Now, repin along the outside edges of each pant leg.  Sew along each side.  Finish seams.


Now you should have a pair of pants!

Finish with the hems:


1.  Fold and iron the top to form a top casing for the waistband elastic.  I do a double fold: a small fold to turn the raw edges in and then a deeper fold for the casing.  Sew around the fold, thus making the casing.  Leave about a 2 inch opening at the back for which to thread the elastic through.   Cut a length of elastic the waist measurement plus a inch.  Thread through the case using a safety pin attached to one end.  When the ends meet, sew them together and then sew your casing shut.  Waistband complete.


Leave opening in waist casing for which to thread elastic through.

2.  Now do the same sort of folding with each pant leg.  Sew as you would the waist casing, although do not leave an opening.  You can make your hem as wide or narrow as you want.  I often like to do a double stitch.  Sometimes, I even do a decorative stitch.  


Pants Hem


Rock On In Your New Pants!